Monday, October 24, 2011

Better late than never

No, I have not dropped off the face of the earth.  However when I realized it has been THREE (yes 3!) weeks since I last posted anything, I can certainly understand why some might think I had.  Bottom line is I have been busy trying to finish projects to have something to post.  I read several blogs and I have come to realize that many blogsters post very regularly, but often their topics include a variety of items other than DIY projects: pics of their vacations, news about their kids/families, or sometimes pictures of what they dream of some day doing.  To each his/her own ..... but I really don't want to post pics of my trips, kids or dreams, nor do I think you really want to see that sort of thing, you all do have your own.  So, when I do post (and I WILL try to do so on a weekly basis) I will always try to make it an actual DIY project in progress or completed.

This post should really be titled: How boring can a hallway be?  Trust me pretty boring!  The long hall that leads from the TV room down to the BR's and 2 of the baths, was dull, drab, dreary and the painting needed to improve it was well, dreadful.  That's a LOT of D's :)  So, first a couple before shots - and btw, I must admit that when I started I thought, can this hall really look all that much better?


Shot looking down the hallway - note the drab wall color, odd colored molding, flush brown doors and brown cabinet - a la 50's style.

This shot is from the back of the hall, looking toward the front BR's:


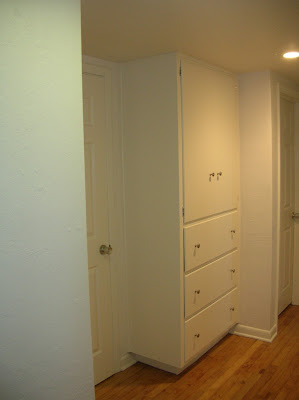
And now a few after shots: after 2 full days of 2 people (thanks DM) priming/painting 7 doors and all the
trim, the walls, ceiling, the 50's style cabinet and the baseboards.  Color choice...hmmmmmm.....let's brighten it up with WHITE and then add some art ( a la Courtney and Robert Novogratz) and paint that nasty cabinet, so that it just vanishes into the wall, until we demo that section of the house. 


So what do you think?  Does the dull, drab, dreary hallway look better?  I do believe it does! and yes....I am so happy that I decided to replace all those old ugly doors with something a bit more updated.  and yes, I am so glad that this project is done - because it was truly boring and seemed like an endless chore and gallons of white paint.

Monday, October 3, 2011

Let there be drapes.....

For those who are calling me a slacker for not posting last week - you have officially guilted me into putting "POST" on my to-do list for today.  Yes, I am still a woman who gets up and loves to make an actual list of things I want to get done.  It can be electronic, mental, written on paper, etc....but there's almost always a list and it's usually way longer than could ever be accomplished in a day.  I suppose it's my weird way of keeping me motivated.

so, on my list last week was getting the drapes in the LR done.  Doesn't sound like a big deal, does it? Ha!  so....here's the saga. Hardware is installed to fit existing beautiful silk panels that came from a former life.  Hang the silk panels and find they look like crap!  Grrrrr! What????? Yep, that looked really bad.  So I thought to myself, well maybe you just need to live with them for a little while.  Really?  didn't work and by the end of the day, I was taking down the silk panels and planning my little "Plan B".  I needed something simpler, cleaner and less fussy.  Anyone besides me thinking IKEA???? Simple, clean-lined and cheap - just what I needed.  So I measure exactly the dimension I would need and find that their standard sized panels are not going to work.  Second Grrrr.  So now I realize that I'm going to have to either move the hardware or band the panels.  Since I do like banding and customizing the most boring of panels and hated the thought of having to reinstall the hardware, the choice was easy.  So while at IKEA, I take a look at their fabrics, which happen to be 58" wide (vs standard 54") and exactly the same width as the panels, again a no-brainer.  I find a fabric that would work, a dark gray with a white line pattern ......and I'm off!  Off to the ironing board that is.  I turn on the DVR to watch my taped shows and iron all the white panels, band them and then realize that I have gone crazy and banded 6 panels and I only need 4.  Grrrr # 3! Mind you, I do not need gray banded panels in any other room - so will now have to cover the extra panels in another color, or hey find a shorter room and just hack them off :)

So scroll down to see the project that should have been easy and seemed to take forever.  First the detail, then a full shot of the panels and finally a bigger view of how the room is shaping up (and yes, still not done).


And while I'm at it - I guess I'll add that the DR drapery panels went up SO easily - like maybe 20 minutes, so I know there really is a God.  And if I add the time it took me to do both rooms and divide by 2 - maybe the time it took to put up the LR panels doesn't seem so bad.  :)

Dining Room panels: super bargain from the Ballards outlet store in ATL - $19.99 per panel (thanks CW!).  I had the black hardward from a previous house, so the only cost was 4 panels for a total of about $80 buckeroos. 


Note: The ugly chandelier is coming down as soon as a replacement is found.


BTW, the LR panels were super cheap inexpensive too.  I think the panels were 29.99 for a pair and the fabric was 1 yard @ 7.99.  Again, I already had the hardware so the whole LR was at a cost of under $80. Then again, that does include cheap labor - ME!!!

No more blogger slacking - promise!