For some strange reason, for the first time in my life - I am into orange. Absolutely no idea why since I have never really been drawn to or used this color before. Like many of us, we go through periods of time where we have our phase of a color. Let's see, I have had my phase with blues, beiges/creams, peaches/corals and even some greens. Orange just never really did it for me.....until now.
While in Atlanta on a girlfriend visit (aka shopping trip), we are out hitting some of our favorite haunts and what do I stumble upon but an orange glass lamp with a lucite base. Thought to myself....hmmmm....that could look great in a future place. It certainly didn't go with the color scheme that I had going at the time. But, I held myself back and walked away. I return from ATL and open the newest issue of House Beautiful or Elle Decor and I see the most beautiful Italian glass lamps that very closely resemble the lamp I had sadly left behind. Guess what shocked me the most was a) how close they were in appearance and b) the price on those in the magazine was $695.!!!
So what does a smart woman do? She picks up her Iphone and calls her sister to ask if she will run down and pick up "my" orange lamp. she agrees and later calls to tell me she has my large orange lamp at her place. Then SHE opens the same magazine article I had seen and sees the price of the Italian version and immediately calls me to say "I know why you wanted me to go back and buy that lamp"! guess I was happy that she was a little behind in her reading :)
The lamp also reminded me of one that Johnathan Adler (I adore him) has for $275.:
http://www.jonathanadler.com/optionlarges/17190_5724.jpg
except his did not have the lucite base and wasn't quite as cool of a shape. Sorry Johnathan - please know I still adore you.
So - finally I get my coveted lamp from Atlanta and I say to myself "Hello Gorgeous"! I LUV LUV LUV this lamp. Can a person really LOVE a lamp???
Voila - take a look at my most loved lamp and the very best part of the happily ever after part of the orange lamp story is that the consignment store price was $37. and on top of that, my very sweet sister who picked it up for me, gave it to me for my birthday present. Ballard's outlet lampshade, was hmmmm....I think $19.
A journey to enhance all household items or an entire home, that have the potential to be beautiful. A deep desire to repurpose, reinvent and transform an item or home, considered by some to be an ugly duckling, into a beautiful swan.
Monday, December 12, 2011
Thursday, December 8, 2011
Twelve Days of Christmas - Day 3
Another step toward a completed TV room that we actually like to go into and enjoy. I guess it looked so bad when I first started, the task of improving the space without a huge budget seemed a bit overwhelming. A complete report and shots of the finished room by the end of this month - I'm waiting for one more thing to arrive before I can show the entire space.
until that time.....a sneak peek of my recent solution to the BIG blank white wall behind the sofa. I had hoped to have a large contemporary piece of art done for the space - but I decided that this month was not the month to blow my wad on new art.
A few weeks ago my sister had put this in a garage sale:
When I mentioned I liked the poster and especially the colors - her response was "take it". So my free poster was the beginning. I knew it wasn't large enough for the wall, but decided that I could let my creative juices flow and come up with something that would work as an interim solution. So, a quick trip to IKEA for some frames came next. I get home to find that the matting is just a wee bit to large for the print I have to work with. Next up a trip out to pick up some black poster board and ta-da my little vision turns into this:
and a close up , so that you can see how the black poster board not only serves as a filler for the .25" shortage once the print was cut into the 4 individual squares. It actually looks like it's double matted.
Total cost for my short-term solution to art ..... until I can purchase that contemporary painting that is out there waiting for me:
4 IKEA Ribba frames $80.
Poster Board $2.
Poster FREE (Thanks MB and CW, who long ago gave it to MB)
I'm very happy to have completed the project for $82 and every time I see the cheerful color on the wall it makes me happy. Can't wait to add up what I have ended up spending on the entire room - but I'm contently finding inexpensive solutions for the space. Truth is, every single budget minded find I come up with, makes me just as happy as spending small fortunes on things as I once did in a former life. Maybe even more happy! :)
Saturday, December 3, 2011
Twelve Days of Christmas - Day 2
OK, almost everyone has a room in their house where they just shove all the crap and think I'll get to that later. Well when we arrived at TUD, for me it was the TV room. Left over furniture, none of it matching or looking like it belonged anywhere, boxes, bolts of fabric....you name it and it and it was probably thrown in this room because the garage and storage units were already full.
so....I finally decide I can no longer stand the dreary little storage area and decide I will turn it into a TV room. This was also the only place the large armoire with the TV would fit - so I suppose that was the deciding factor.
Although the room is not quite finished, I thought I would give you a shot of something funny.
In my storage warehouse, I had a good Candice Olsen couch that was really comfortable.....so I have it picked up and brought over, thinking I could maybe slipcover it and it would be a good comfy (cheap) solution for the room. As soon as it gets here, I realize that it won't fit through the opening to the room. Does the term "trying to fit a square peg into a round hole" ring a bell with anyone? Determined woman that I am - and only about an inch shy of shoving it through.....I saw off a piece of the door casing and with the help of my very strong ex-husband (who still helps me move furniture!!) we heave-ho it through.
Shot below is as it sits, once into the space and definitely in it's "I'm blue and don't match anything" state:
Truth is absolutely NOTHING matched in the room! But ahhhh.....I did have a vision.
See the couch after I put my Ballards Outlet (Atlanta) super-priced slipcover. Can you believe I got this slipcover for $16???? It's great to have friends in Atlanta that help me in the hunt - thanks CW. It was not a perfect fit, so I retro-fitted it and it turned out pretty darn good :)
So now I have a sofa and an armoire.....it's definitely coming together. Hope to have final shots of the room to you very soon. Stay tuned!
Thursday, December 1, 2011
Twelve Days of Christmas - Day 1
On the first day of Christmas, a blogger gave to me: One FINISHED room! My goal this month is to post 12 times - hence the 12 Days of Christmas theme :) Think I can do it? well, I promise to give it my best college try, but am also glad that nobody is holding a gun to my head. Between time spent taking care of life, twins and enjoying the fabulous Mr. S - it is really difficult to finish projects here. On top of that this month, I have holiday parties, family and guests arriving and twins out of school for 2 LONG weeks. Ahhhhhh.....the excuses challenges!
so while many of you are wondering where in the hell I have been, I am continuing to make progress here at my current Ugly Duckling project. Voila - ONE room finally done.
Before pictures:
so while many of you are wondering where in the hell I have been, I am continuing to make progress here at my current Ugly Duckling project. Voila - ONE room finally done.
Before pictures:
Shot from hall leading into bedroom
Sorry - no wide angle lens available to shoot this small room
The best thing about the room - the nice large window and natural light
The worst thing/s about the room, the color, old doors/colonial trim and size (a little small)
And now the after shots....much more cheerful and makes one of the twin duo very happy.
Same angle as before shot - from hall entry into room
Still no wide angle lens or good camera (hello.....Santa!!) - but shot of room
Lego art! I used the old wooden valances from the LR to make long display shelves for Lego creations.
Genious thought I might add, as it cost absolutely nothing and is his favorite item in the entire room.
Bargain score - the nail head headboard - $35 at a garage sale
All other items already on hand from previous life.
Study area in front of window. Had to purchase blinds and curtain panels,everything else already on hand.
Note: this WAS my desk, but an alien took over my brain and decided it was better in this room.
My favorite part of the room might just be the freshly painted doors and update on the trim.
Sometimes it's the little things in life!
And the happily ever after end of this little room is that my persian rug, which was a gift
that I dragged back from Kuwait, finally has found a home - and it truly looks fabulous here!
And yes the pressure is now big-time on me to work on the other half of the twin duo's room, who has already lodged her very LOUD complaints that his room was done first.....to which I replied "well he was born first" - by 2 minutes.
PS Please know that I am now fast and furiously working to get her room done. problem is that like most women, she has an opinion about almost everything and most definitely wants to weigh in on the entire project. my little guy simply says....."oh that's nice mom - I love it" :)
Friday, November 4, 2011
Entry Happiness
When we first arrived at this little Ugly Duckling, it was a real toss-up as to what bugged me the most. One of the things I knew would need a facelift, was the very homely entry. Every day I walked in, or opened the door to an arriving guest it would bug me. Soooooooo.......how do we make a cheap quick fix to another area that will eventually be ripped out? Paint of course! First, the before shots:
See what I mean? It was pretty sad/gross looking.
Long term plans will require us to rip that closet out (the A/C system that once lived there has already been removed) and we will put new flooring through out the entry, LR, DR and kitchen, so this fix had to be something that would make it look a bit better just for now.
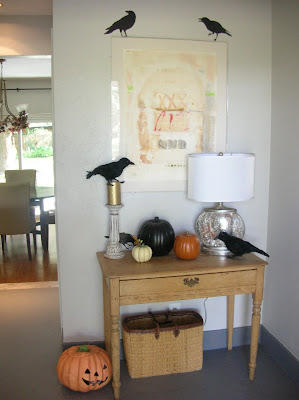
After talking to my HD paint expert Jack, who is fast becoming a BFF, and buying 1 gallon of Behr porch paint for the floor,.....voila! After shots, are done with our Halloween decorations out, but you will see that my quick fix does indeed make it look much more cheerful each and every time I open that front door.
Don't mind the faux crows - the twins loved them - but they are not permanent!
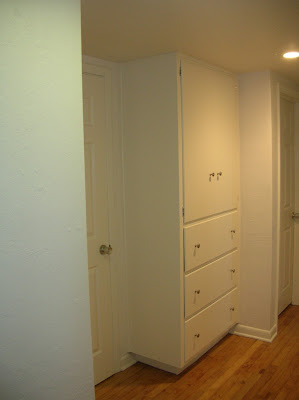
a shot of the 50's style cabinets, which will also be demolished when we renovate, for now painted and sporting new knobs from IKEA.......ahhhh....they at least look a tad bit more updated for just the cost of the knobs.
So now I have a temporary fix that brings me "entry happiness" on a daily basis.
Sometimes, it truly is the little things
Monday, October 24, 2011
Better late than never
No, I have not dropped off the face of the earth. However when I realized it has been THREE (yes 3!) weeks since I last posted anything, I can certainly understand why some might think I had. Bottom line is I have been busy trying to finish projects to have something to post. I read several blogs and I have come to realize that many blogsters post very regularly, but often their topics include a variety of items other than DIY projects: pics of their vacations, news about their kids/families, or sometimes pictures of what they dream of some day doing. To each his/her own ..... but I really don't want to post pics of my trips, kids or dreams, nor do I think you really want to see that sort of thing, you all do have your own. So, when I do post (and I WILL try to do so on a weekly basis) I will always try to make it an actual DIY project in progress or completed.
This post should really be titled: How boring can a hallway be? Trust me pretty boring! The long hall that leads from the TV room down to the BR's and 2 of the baths, was dull, drab, dreary and the painting needed to improve it was well, dreadful. That's a LOT of D's :) So, first a couple before shots - and btw, I must admit that when I started I thought, can this hall really look all that much better?
Shot looking down the hallway - note the drab wall color, odd colored molding, flush brown doors and brown cabinet - a la 50's style.
This shot is from the back of the hall, looking toward the front BR's:
And now a few after shots: after 2 full days of 2 people (thanks DM) priming/painting 7 doors and all the
trim, the walls, ceiling, the 50's style cabinet and the baseboards. Color choice...hmmmmmm.....let's brighten it up with WHITE and then add some art ( a la Courtney and Robert Novogratz) and paint that nasty cabinet, so that it just vanishes into the wall, until we demo that section of the house.
So what do you think? Does the dull, drab, dreary hallway look better? I do believe it does! and yes....I am so happy that I decided to replace all those old ugly doors with something a bit more updated. and yes, I am so glad that this project is done - because it was truly boring and seemed like an endless chore and gallons of white paint.
Monday, October 3, 2011
Let there be drapes.....
For those who are calling me a slacker for not posting last week - you have officially guilted me into putting "POST" on my to-do list for today. Yes, I am still a woman who gets up and loves to make an actual list of things I want to get done. It can be electronic, mental, written on paper, etc....but there's almost always a list and it's usually way longer than could ever be accomplished in a day. I suppose it's my weird way of keeping me motivated.
so, on my list last week was getting the drapes in the LR done. Doesn't sound like a big deal, does it? Ha! so....here's the saga. Hardware is installed to fit existing beautiful silk panels that came from a former life. Hang the silk panels and find they look like crap! Grrrrr! What????? Yep, that looked really bad. So I thought to myself, well maybe you just need to live with them for a little while. Really? didn't work and by the end of the day, I was taking down the silk panels and planning my little "Plan B". I needed something simpler, cleaner and less fussy. Anyone besides me thinking IKEA???? Simple, clean-lined and cheap - just what I needed. So I measure exactly the dimension I would need and find that their standard sized panels are not going to work. Second Grrrr. So now I realize that I'm going to have to either move the hardware or band the panels. Since I do like banding and customizing the most boring of panels and hated the thought of having to reinstall the hardware, the choice was easy. So while at IKEA, I take a look at their fabrics, which happen to be 58" wide (vs standard 54") and exactly the same width as the panels, again a no-brainer. I find a fabric that would work, a dark gray with a white line pattern ......and I'm off! Off to the ironing board that is. I turn on the DVR to watch my taped shows and iron all the white panels, band them and then realize that I have gone crazy and banded 6 panels and I only need 4. Grrrr # 3! Mind you, I do not need gray banded panels in any other room - so will now have to cover the extra panels in another color, or hey find a shorter room and just hack them off :)
So scroll down to see the project that should have been easy and seemed to take forever. First the detail, then a full shot of the panels and finally a bigger view of how the room is shaping up (and yes, still not done).
And while I'm at it - I guess I'll add that the DR drapery panels went up SO easily - like maybe 20 minutes, so I know there really is a God. And if I add the time it took me to do both rooms and divide by 2 - maybe the time it took to put up the LR panels doesn't seem so bad. :)
Dining Room panels: super bargain from the Ballards outlet store in ATL - $19.99 per panel (thanks CW!). I had the black hardward from a previous house, so the only cost was 4 panels for a total of about $80 buckeroos.
Note: The ugly chandelier is coming down as soon as a replacement is found.
BTW, the LR panels were super cheap inexpensive too. I think the panels were 29.99 for a pair and the fabric was 1 yard @ 7.99. Again, I already had the hardware so the whole LR was at a cost of under $80. Then again, that does include cheap labor - ME!!!
No more blogger slacking - promise!
Thursday, September 22, 2011
A very important corner....The Bar!
Crazy wild week and so what do I decide to post about.....a very important corner, yes indeedy....it would be the bar! OK, now while I fully understand that this might not be the most important corner to some and in actuality it really isn't in a corner (more like the middle of a wall) - hell, after how important it has been in my life since the move, I think it certainly ranks a post all to itself.
So without further chat - a picture or two:
OK, truth # 1, it's not a real bar, rather a sideboard in the DR with a Pottery Bar tray filled with everything at the ready to make a quick martini when needed, What more does a bar really need?
Truth # 2 - this bar has had MUCH use since move-in day.
Truth # 3 - Although most of my friends love the fact that I have an open bar at the ready about 10 steps from the front door, the tray can be removed in a flash and hey....the DR looks like a normal DR with a boring table and sideboard ready to serve something other than a martini, like maybe a dinner.
Truth # 4 - Dinner has yet to be served from the sideboard, but many martinis have been served.
and now for a really important announcement:
Truth #5 - "The Bar is Open" as in always open!
and for those few who might like to see what this area looks like if it ever were to actually serve food - take a look at the below picture and just imagine the tray between the lamps gone.
Details: sideboard purchased years ago at a local consignment shop, lamps were super bargains at the Ballard's outlet in Atlanta at about $20 each (including the shade) and then I sprayed them with Rustoleum's Metalic Silver, tray from PB (maybe not a real bargain, but exactly what I was looking for so I bit the bullet), martini glasses were a gift from a friend, who knows me well (Thanks LM) and the very best part of the scene, the story of the mirror. A friend and I went to an auction not intending to buy a thing and 2 hours later, we had both purchased chandeliers and she purchased a beautiful rug and this very large mirror. The rug made it back to her home in Atlanta, but the mirror is so large, it's on loan at my place until she can find a moving truck heading her way. I hope it's not for a very long time :) (Thanks CW)
Thursday, September 15, 2011
Another corner completed
OK, I'm digging this concept of a corner at a time. It seems to keep me focused on completing 1-2 projects per week and ta-da.....with the week not quite over yet, I actually have a corner to post. While I would love to finish an entire room in a week, the bottom line is I don't have a team (like Nate!) - just the twins - who sometimes are not the best of assistants. The scary part is that they really do think they have skills and they do, I just don't want them handling some of my collections quite yet.
Back to the corner of the week: in a corner of the LR there are a set of built-in books shelves that are dated and when we re-do the entire fireplace wall will be eliminated. In the meantime and since I need and want to make the place look better until we can get to our very long to-do list, this is one of those projects that is meant to "spiff it up for now". BTW, this is a term I am using a lot these days. Another favorite being said often by the twins is one I shared with them "from drab to fab" ......sort of gives all of us hope:)
so the before shots of the dated shelving unit:
Another angle:
and despite the fact that I could not find an entire box of some of my favorite blue/white collectables (there seems to be an entire box missing, which undoubtably will eventually surface), I give you the after:
and yes, I do believe that they are ready for their close-up:
OK - since my favorite bloggers post the costs associated with their projects, I am going to try and do the same. This one is easy to report - total cost: $6.00 - for wall paper paste. I had white paint left over to paint the shelves with and had the wall paper left over from a former house. Every single item on the shelves was something I had in my 2 former lives (collected or given to me as gifts over the years). The really nice part of this project was that with every piece I placed, I remember where I got it or who gave it to me. Some of it was purchased on trips to England, France, etc but all were purchased for a fairly low price. The brown leather box that holds silver at the very bottom was $5. at the SA. One of the pieces of brown transferware was given to me by my sister who bought a box of "junk" at an auction and the brown transferware bowl actually had old scrambled eggs in it. I think she washed it before she gave it to me :) Anyway, it was a fun project that combines some beautiful now- expensive pieces with bargains from my treasure hunting.....a true mix of high and low, which makes me smile every time I look at it. So now, in the LR I have 2 corners completed that I can sit and gaze at with that glass of wine. That means 2 more to go and I might give you a glimpse of the entire room. I still have a long way to go.
Off to start the next corner - so stay tuned!
Monday, September 12, 2011
Remote UD Project
Let me begin by saying that I really do not go out searching for other UD (Ugly Duckling) projects, but somehow they just find me. Lord knows that I have quite enough to do here at MUD (My Ugly Duckling....ok, so now I know you all are catching onto my DIY lingo) - however there was a bathroom in bigtime need of a little nip tuck major facelift and I decided that I couldn't just walk away. So, I wanted to share with you a couple of shots of the before, which you'll note is filled with dusty fake plants, green stenciled walls and what seemed like a million knick-knacks (all done by an ex-wife), to the after.....which truly much more accurately reflects the gentleman who happily now lives there without the ex-wife :)
Before:
After the facelift:
Before:
After the facelift:
Very inexpensively transformed by painting the walls SW Gray Screen, the cabinets SW Dover White, new hardware for cabinets....stock item straight off the shelves Home Depot, and the beautiful Moroccan screen (sprayed, cut and installed by my great carpenter) was completely free. It was a cast-off by my sister who found it at the SA and never could find quite the right spot for it. Then again, she doesn't have any of those dusty plant shelves to fill in her very cool house!
OK.....back to my own UD!!
Thursday, September 8, 2011
Progress.....one corner at a time!
Ok, so smart woman that I am, I have already concluded that if I am ever to post a room completely done, it may take so long that all of you will give up on me. Hmmmmm......what to do? Lightbulb moment: post "a corner at a time". Surely I can get a corner done - post it - and then continue onto another corner, etc. I mean come on, there are only 4 corners in a room right? :)
so, I have decided to send you shots of little snipets of my slow but sure progress. First, a before shot of sort of a lost little table that had been cast off by it's former owner.
And for those of you that are now thinking - hey, where's that little ugly duckling table - here you go
so, I have decided to send you shots of little snipets of my slow but sure progress. First, a before shot of sort of a lost little table that had been cast off by it's former owner.
Just so happened that I needed a small little table in a corner, for a very cute little lamp I recently purchased. So, one can of spray paint and 10 minutes later, I had a fabulous little metalic-colored table, which was perfect for my very first completed corner.
and voila.......a corner of the LR is at least complete.
So now almost every morning, you'll find me sitting on the sofa drinking my coffee and gazing out at the beautiful golf course view .... or my ONE finished corner. BTW, almost every evening, you'll find me having a glass of wine and doing the same thing!
Budget for corner:
1 can spray paint $2.98
2 books (Estate sale @ $1 each) $2.00
Lamp from HomeGoods $24.99
All other items I already had from my former lives
Total spent: $30.00
Now if all my other "corners" could just come in at this bargain-basement price, I would be sitting pretty. Unfortunately - that's definitely NOT going to happen, but hey, a woman can dream. The estimate for the pool in the little ok well maybe I should say large "corner" of the yard nearly put me into cardiac arrest!!
Subscribe to:
Posts (Atom)